Prosthetic Arm
The prosthetics available for upper appendage amputees are much less advanced and generally more crude that those available to replace missing legs. The human arm is much more sophisticated and articulate than the leg. Therefore many arm prosthetics are either cosmetic in nature or robotic, but both are too expensive to work in developing countries. So when we began designing a prosthetic arm, we first determined the needed functions. Like the rest of our projects, the arm would have to cost virtually nothing and be variable so as to be used by different amputees. Aside from that, we wanted it to be able to grip with variable levels of strength, and be able to support a twenty pound static load.
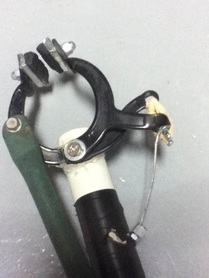
I watched some youtube videos and shared them with Vanessa. The simplest professional design we could find involved a gripper that open through shoulder flexion. The arm in the video was controlled using a cable system similar to brakes on a bike, so we decided to try and modify a bike brake to work in a similar fashion. When the amputee flexed their shoulders, the brake cable would pull and open the "C" shaped brakes.
The use of these brakes gave rise to another level of engineering: attachments. The brake pads simply bolt on. Virtually any object can be modified to fit the .5" slot in the brakes. Different grippers made of different materials could be swapped out in second. Attachments that hold pens, pencils, forks, knives, and tools can easily be fabricated, and can provide the patient with a wide range of functions for their new arm.
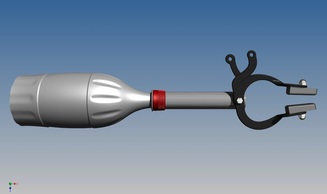
On the other end of the project, I worked on fitting the prosthetic to the stump. In a professional setting, a plaster cast would be made, and a durable socket could be formed with plastic, fiberglass, or carbon fiber. But in developing countries, people do not have access to these processes or materials. I did some research and found that very simple prosthetics can be made by melting a two liter soda bottle around a positive plaster cast. A video of this process can be found here. I decided to try and modify this method of fabrication so that it did not require a plaster mold. So bravely I donned a long, thick sock and wetted in the sink. I slid an empty bottle over my hand and held it over my dad's hot barbeque grill. Thankfully, the process worked perfectly. My arm stayed relatively cool while the plastic shrunk to fit. I tried this again later at school with a heat gun, (a common tool) and had very gratifying results. The bottle fit my hand so well that I had to cut it off with tin snips! This is the process we'll use to make simple, fast, and cheap sockets for upper appendage amputees.
The connecting portion is to be done with PVC pipe. PVC is widely available, cheap, durable, and can be cut to any length. Pictures and demonstrations can be found in our gallery.
I watched some youtube videos and shared them with Vanessa. The simplest professional design we could find involved a gripper that open through shoulder flexion. The arm in the video was controlled using a cable system similar to brakes on a bike, so we decided to try and modify a bike brake to work in a similar fashion. When the amputee flexed their shoulders, the brake cable would pull and open the "C" shaped brakes.
The use of these brakes gave rise to another level of engineering: attachments. The brake pads simply bolt on. Virtually any object can be modified to fit the .5" slot in the brakes. Different grippers made of different materials could be swapped out in second. Attachments that hold pens, pencils, forks, knives, and tools can easily be fabricated, and can provide the patient with a wide range of functions for their new arm.
On the other end of the project, I worked on fitting the prosthetic to the stump. In a professional setting, a plaster cast would be made, and a durable socket could be formed with plastic, fiberglass, or carbon fiber. But in developing countries, people do not have access to these processes or materials. I did some research and found that very simple prosthetics can be made by melting a two liter soda bottle around a positive plaster cast. A video of this process can be found here. I decided to try and modify this method of fabrication so that it did not require a plaster mold. So bravely I donned a long, thick sock and wetted in the sink. I slid an empty bottle over my hand and held it over my dad's hot barbeque grill. Thankfully, the process worked perfectly. My arm stayed relatively cool while the plastic shrunk to fit. I tried this again later at school with a heat gun, (a common tool) and had very gratifying results. The bottle fit my hand so well that I had to cut it off with tin snips! This is the process we'll use to make simple, fast, and cheap sockets for upper appendage amputees.
The connecting portion is to be done with PVC pipe. PVC is widely available, cheap, durable, and can be cut to any length. Pictures and demonstrations can be found in our gallery.